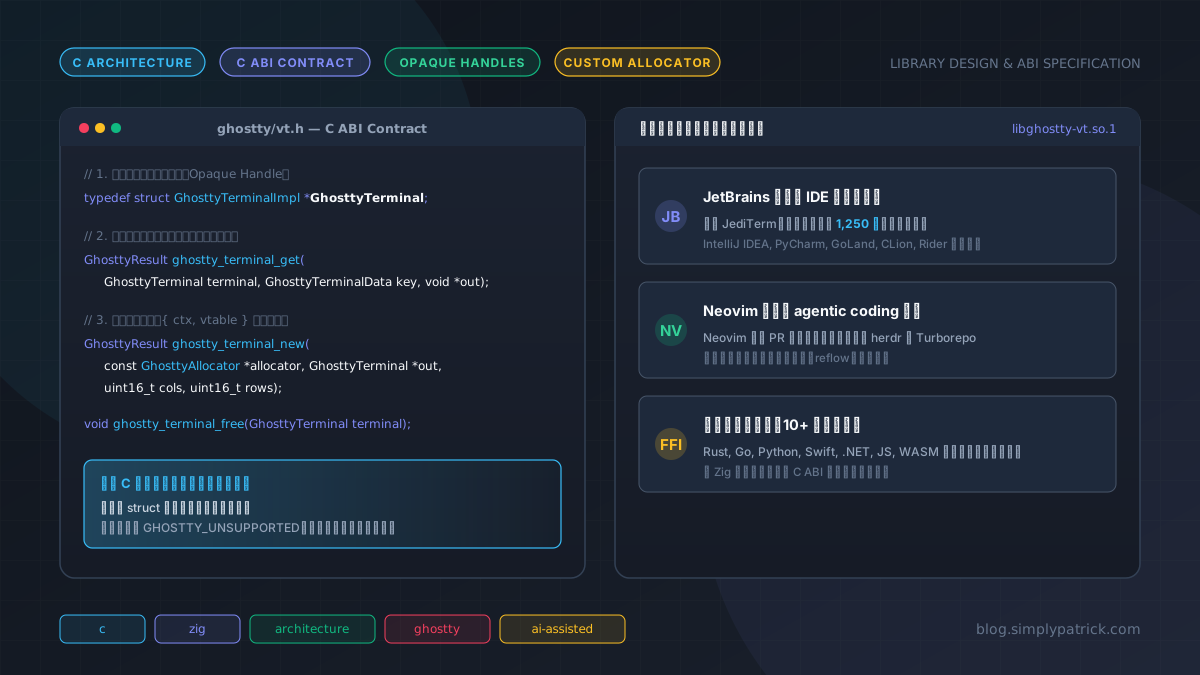
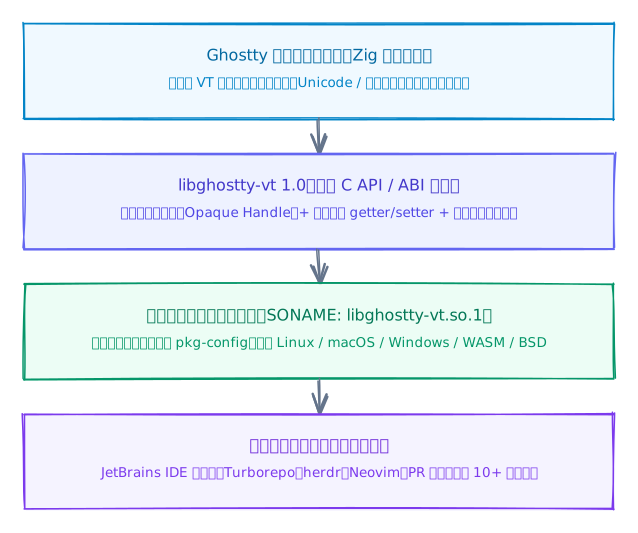
近日在 Hacker News 上讀到一則熱門討論:Libghostty 1.0。Mitchell Hashimoto 正式宣布 libghostty-vt 1.0 釋出,為這個從 Ghostty 終端機中獨立出來的核心元件建立正式的 ABI 穩定保證與語意化版本承諾。
這篇公告之所以在社群引起廣泛共鳴,不僅是因為這套終端機核心已經投入大型生產環境——例如擁有超過 1,250 萬名定期活躍開發者的 JetBrains 全系列 IDE(IntelliJ、PyCharm、GoLand 等),已將內建終端機底層從 JediTerm 替換為 libghostty;Neovim 亦已有獲批准的 PR 準備取代原有的 libvterm 以改善視窗縮放重排版(reflow)支援(待正式釋出後整合);甚至 Vercel 的 Turborepo 與社群中許多代理式(agentic)程式設計工具(包括我日常在 Hyprland 下使用的多代理管理工具 herdr)都直接依賴它的核心能力。
但對系統工程師而言,更吸引人的是 Mitchell 在文中展現出對「現代 C 函式庫」的細緻雕琢:以 Zig 開發、卻以嚴謹的 C ABI 交付給全世界。
在現代軟體工程中,儘管許多新專案轉向 Rust 或 Zig 開發,C ABI 依然是跨語言、跨系統呼叫的通用語言(lingua franca)。然而,很多現代函式庫在包裝 C 介面時,往往只停留在「能用 extern "C" 呼叫就好」的粗糙層次,忽視了二進位相容性、記憶體自主權與發行版封裝的需求。
藉由 libghostty-vt 1.0 的設計哲學,我們可以具體梳理出一套現代 C 函式庫應該具備的架構修養。
徹底的不透明控制代碼(Opaque Handle)
在設計 C 語言函式庫時,最常見的架構盲點,就是直接在公開標頭檔(header)中暴露 struct 的內部記憶體佈局:
// 不良設計:公開 struct 佈局
struct ghostty_terminal {
    int rows;
    int cols;
    char *cursor_style;
    // 只要未來內部新增一個欄位,sizeof(struct ghostty_terminal) 改變,
    // 若新版函式庫依新佈局存取舊版呼叫端配置的物件,可能發生記憶體越界,或以錯誤的元素間距存取陣列。
};
一旦 sizeof(struct) 在呼叫端編譯期被固定,函式庫內部若直接調整或新增欄位,就會改變結構大小與位移,進而破壞物件佈局的 ABI(Application Binary Interface)相容性。
libghostty-vt 的首要原則就是:每一個核心物件都是不透明控制代碼(Opaque Handle)。
// 現代 C 函式庫作法:ghostty/vt/types.h
typedef struct GhosttyTerminalImpl *GhosttyTerminal;
標頭檔中只宣告前置型別,實際的結構定義完全留在函式庫實作內部。宿主程式只能持有控制代碼指標,永遠無法直接解參考(dereference)結構,也無法在堆疊(stack)上為其配置空間。物件的配置與生命週期完全由建構與解構函式管控:
// ghostty/vt/terminal.h
GhosttyResult ghostty_terminal_new(
    const GhosttyAllocator *allocator,
    GhosttyTerminal *out,
    uint16_t cols,
    uint16_t rows
);
void ghostty_terminal_free(GhosttyTerminal terminal);
這項設計雖然意味著每一次實例化都必須由函式庫負責,卻換來了堅實的防護邊界:內部無論重構演算法、調整記憶體對齊(alignment),還是新增內部欄位,外部動態鏈結的程式碼都不會受到結構尺寸與佈局變化的波及。
列舉驅動的屬性存取器(Enum-Keyed Accessors)
傳統 C 函式庫常為每一個屬性定義一對專屬的 getter / setter:
// 傳統設計:符號爆炸且無法優雅處理向後相容
int ghostty_terminal_get_rows(GhosttyTerminal terminal);
int ghostty_terminal_get_cols(GhosttyTerminal terminal);
int ghostty_terminal_get_cursor_x(GhosttyTerminal terminal);
int ghostty_terminal_get_cursor_y(GhosttyTerminal terminal);
// 若新版本新增了 ghostty_terminal_get_bracketed_paste(),
// 舊版 .so 執行期直接跳出動態符號未找到(undefined symbol)!
終端機模擬器有數百種狀態值需要讀取與設定。如果每個屬性都獨立成為匯出符號(exported symbol),不僅動態鏈結時的符號表(.dynsym)龐大冗餘,更實際的問題在於:當宿主程式以較新的標頭檔編譯並實際呼叫了新增的存取函式,卻在使用者環境中鏈結到尚未包含該符號的舊版動態函式庫時,動態鏈結器就會因找不到符號而拒絕載入。
libghostty-vt 在屬性存取上採取了極具擴充性的列舉驅動存取模型(enum-keyed getters & setters):
GhosttyResult ghostty_terminal_get(
    GhosttyTerminal terminal,
    GhosttyTerminalData key,
    void *out
);

GhosttyResult ghostty_terminal_set(
    GhosttyTerminal terminal,
    GhosttyTerminalOption opt,
    const void *val
);
這種介面帶來的架構優勢非常明顯:
- 屬性存取介面收斂 - 雖然整個函式庫因終端機控制與繪圖支援匯出了 180+ 個函式,但數百種可讀寫屬性全數收斂至同一組列舉存取器,不會隨未來新增終端機狀態而無限膨脹符號表。
- 優雅的向後相容性降級 - 當新版應用程式向舊版函式庫請求一個尚未實作的列舉鍵時,函式只會明確回傳
GHOSTTY_UNSUPPORTED狀態碼,呼叫端可以立刻以預設值回退,避免在載入期發生動態符號遺失(當然,呼叫端仍須確保傳入的void *out指標型別與配置空間符合該列舉鍵的規範)。 - 固定列舉底層寬度 - 在 C 標準中,
enum的底層整數型別大小可能因編譯器或架構最佳化而浮動(如-fshort-enums)。libghostty-vt以GHOSTTY_ENUM_TYPED巨集在 C23 與 C++11 之後直接展開為: int明確指定底層型別;較舊的 C 模式則在每個列舉尾端加上INT_MAX哨兵值,確保底層型別至少具備int寬度。這是在 C 標準允許範圍內能達到的最大保證,也讓 Zig 端以c_int對應時始終維持 ABI 一致。
對於極少數必須以結構傳遞的情境,libghostty-vt 也規範該結構必須在首個欄位攜帶自身的結構大小(size_t size,並搭配 GHOSTTY_INIT_SIZED 巨集初始化),或是預留足夠的對齊填充空間(reserved padding),讓未來的版本可以在結構尾端擴充新欄位而不破壞舊版的位移量(offset)。
記憶體自主權:不奪走宿主的配置器
許多 C/C++ 函式庫常見的限制,在於內部死板地硬編碼呼叫 malloc、free 或自行啟動背景執行緒(threads)。
這在複雜的宿主環境中常帶來整合限制:
- WebAssembly 與嵌入式系統 - 可能根本沒有標準的作業系統堆積(heap)或執行緒執行期。
- 高吞吐遊戲引擎或 IDE - 宿主通常具備自己的專屬記憶體池(memory arena、bump allocator 或 NUMA-aware 配置器),若第三方函式庫直接向作業系統申請記憶體,容易打亂快取並引發記憶體碎片化。
- Rust 與 Go 等跨語言 FFI - 跨越 FFI 邊界釋放記憶體是常見的雙重釋放(double-free)與記憶體洩漏溫床。
Mitchell Hashimoto 在設計 libghostty-vt 時立下嚴謹規範:
“For resource usage, the library creates no threads, allocates only through an allocator you can customize, and uses minimal compute and memory.”
libghostty-vt 在內部不建立任何背景執行緒,也不直接處理 PTY 或畫面繪製(交由宿主負責);它是一個純粹的狀態機與資料解析引擎(同一 GhosttyTerminal 實例並非執行緒安全,需由宿主自行同步存取;且同步回呼函式內不得對同一 terminal 再次重入呼叫 ghostty_terminal_vt_write() 或 ghostty_terminal_vt_write_until())。所有需要動態記憶體的運算,全數透過呼叫端注入的兩層式 GhosttyAllocator 介面(直接對齊 Zig 的 std.mem.Allocator 模型):
// ghostty/vt/allocator.h
typedef struct {
    GhosttyAllocatorAllocFn  alloc;   // 必要:配置記憶體
    GhosttyAllocatorResizeFn resize;  // 原地調整大小,不移動位址(可為 NULL)
    GhosttyAllocatorRemapFn  remap;   // 允許移動位址的重新配置(可為 NULL)
    GhosttyAllocatorFreeFn   free;    // 必要:釋放記憶體
    void *reserved[4];                // 預留欄位,初始化時必須清零為 NULL
} GhosttyAllocatorVtable;

typedef struct {
    void *ctx;
    const GhosttyAllocatorVtable *vtable;
} GhosttyAllocator;這套兩層式設計(ctx 承載呼叫端狀態,vtable 承載函式指標表)展現了細膩的介面契約與 ABI 考量:
- 共享唯讀分派表與預留槽檢查 -
vtable可以宣告為靜態唯讀(static const)共享,且尾端自帶reserved[4]預留槽,未來擴充新配置行為時無需更動結構大小(呼叫端初始化時必須將reserved清零為NULL,debug 建置會主動檢查)。此外,函式庫不會複製GhosttyAllocator結構本身,因此傳入的配置器實例在相關記憶體全數釋放前必須維持有效。 - 長度與對齊參數對稱交還 - 函式庫在釋放(
free)、原地調整(resize)或重新配置(remap)記憶體時,會將原先配置時的alignment與目前長度對稱傳遞給配置器,呼叫端無需在每個記憶體區塊前端額外記錄長度標頭。 - 支援對齊 SIMD 運算 - 介面中的
alignment參數儲存對齊位元組數以 2 為底的對數(實際對齊要求為1 << alignment位元組),讓向量化操作(AVX2 / NEON)可直接取得對齊緩衝區,避免手動偏移。
當呼叫端傳入 NULL 時,函式庫會溫和地回退至預設配置器;而當宿主是 Rust 或 Zig 時,開發者可以把宿主語言的 arena allocator 或記憶體追蹤器整合進來。
當記憶體配置的主導權還給呼叫端,函式庫才能順暢地嵌入至各種執行環境(從獨立微控制器到大型 JVM 程式)。
發行版友善:嚴格的二進位封裝與 SONAME
一個只在作者本機跑得通、但 Linux 發行版維護者(distro packagers)難以依據發行版規範打包的函式庫,不能稱作優秀的函式庫。
過去許多現代開源專案只提供原始碼建置或靜態鏈結(static linking),對共享函式庫(shared library)的規格缺乏考量。但在 Debian、Arch Linux、Fedora 或 Alpine 等 Linux 生態系中,動態函式庫的升級必須遵循嚴格的系統級規範。
libghostty-vt 1.0 從發布第一天起,就遵循了完備的系統打包準則:
- 正確標記 SONAME 與 major version - 在 Linux 與 BSD 系統上,動態庫編譯會產生正確的
libghostty-vt.so.1,並搭配 ELF 符號版本控制檔(ghostty-vt.map)精確定義符號節點。唯有當未來發生不相容的重大 ABI 破壞時,才遞增為.so.2。 - 語意化版本(SemVer)承諾 - 從 1.0 開始,任何 1.x 的次版本號更新,都保證能夠直接作為 drop-in 替換舊版二進位檔案,既有的軟體完全無需重新編譯。
- 標準 pkg-config 支援 - 提供標準的
libghostty-vt.pc,讓建置系統透過一行pkg-config --cflags --libs libghostty-vt就能準確取得標頭路徑與鏈結旗標。 - 自動化 ABI 破壞檢驗 - 在 CI 流程中針對 Linux/ELF 整合
libabigail工具(abidiff)進行基準比對(1.0 釋出時基準檔尚未提交,CI 先將 dump 存成 artifact,待 vt-1.0.0 標記後正式轉為自動比對;macOS / WASM 另以專屬型別 manifest 把關),將人為疏失阻絕在合併之前。
在 macOS 上,它也同步寫入標準的相容性版本(compatibility version)資訊,確保無論在何種作業系統上,包裝工具都能自動化識別相依關係。
建置工具鏈與 ABI 驗證
許多人好奇:既然核心是用 Zig 寫的,要產出上述高規格的 C 函式庫,是不是只要執行一行 zig build-lib 就夠了?
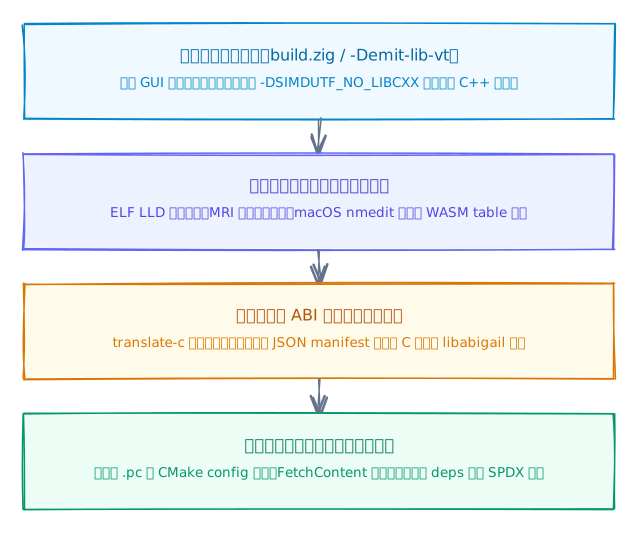
檢視 Ghostty 儲存庫(以下分析基於儲存庫 commit 0fa3d57)中的 build.zig 與 src/build/ 目錄後會發現,為了將 Zig 模組封裝成符合各作業系統慣例的原生 C 產物,libghostty-vt 實作了一套完整的建置與驗證管線。
雙模式單一儲存庫與預設零 C++ 執行期依賴
Ghostty 終端機應用程式與 libghostty-vt 函式庫共用同一個單一儲存庫(monorepo),但擁有各自獨立的版本號與建置圖(build graph)。build.zig 開頭就把兩個版本分開宣告:
/// The libghostty-vt version, released separately from the app with
/// `vt-X.Y.Z` tags. See `Config.libVersion` for how builds use it.
///
/// CMakeLists.txt and CI read this line with a regular expression, so
/// keep it on one line in this form.
const lib_version = "1.0.0-dev";

/// Minimum required zig version.
const minimum_zig_version = @import("build.zig.zon").minimum_zig_version;

comptime {
    buildpkg.requireZig(minimum_zig_version);
}
comptime 區塊會在建置腳本編譯期就檢查 Zig 版本,版本不符直接停止,避免打包者用錯編譯器卻得到難以理解的錯誤訊息。
是否進入函式庫模式,則由 src/build/Config.zig 決定:
// Default dependency builds to libghostty-vt-only mode. Consumers can
// still explicitly disable this to request the full Ghostty build.
const is_dep = b.dep_prefix.len > 0;
const emit_lib_vt = b.option(
    bool,
    "emit-lib-vt",
    "Build and install libghostty-vt only. Disables the xcframework, " ++
        "macOS app, and docs by default. Without this, libghostty-vt " ++
        "is not installed unless Ghostty is a dependency.",
) orelse (is_dep or
    // A libghostty-vt source tarball has LIB_VERSION but no VERSION.
    (versions.lib_file != null and versions.app_file == null));
也就是說,當 Ghostty 作為其他 Zig 專案的相依套件(is_dep),或根目錄存在 LIB_VERSION 但沒有應用程式的 VERSION(即官方 libghostty-vt 源碼包的結構),抑或顯式傳入 -Demit-lib-vt 時,build.zig 就會切換至函式庫模式,略過 GUI 資源、字型、佈景主題與多語系翻譯的下載與編譯:
// ...
// Only the app uses them, so a libghostty-vt build skips them, which
// also keeps it from downloading the themes package.
const resources: ?buildpkg.GhosttyResources = if (config.emit_lib_vt)
    null
else
    try buildpkg.GhosttyResources.init(b, &config, &deps);
更值得留意的是它對 C++ 第三方加速庫的預設處理方式。libghostty-vt 內部依賴 simdutf 與 Google Highway(兩者皆為 C++ 專案)來進行高速 UTF-8 驗證與 SIMD 解析。若是一般建置方式,這會導致最終產出的 C 函式庫在執行期被迫連帶依賴 libc++ / libstdc++。為了在預設內嵌(vendored)建置下消除這個額外負擔,pkg/simdutf/build.zig 在編譯期傳入了關鍵旗標:
// Only linked statically into libghostty-vt and the app: export nothing.
try flags.append(b.allocator, "-fvisibility=hidden");

if (no_libcxx) {
    try flags.append(b.allocator, "-DSIMDUTF_NO_LIBCXX");
    try flags.append(b.allocator, "-fno-exceptions");
    try flags.append(b.allocator, "-fno-rtti");
    // ...
    lib.root_module.addCMacro("SIMDUTF_NO_LIBCXX", "1");
}
透過關閉 C++ 例外處理、RTTI 與標準庫依賴,同時以 -fvisibility=hidden 隱藏所有內部符號,libghostty-vt 在預設建置下借用了 C++ 標頭檔與模板能力,卻在執行期剝離了對 libc++ 的依賴,讓預設產物維持單純的 libc 相依性。
若打包者改用系統函式庫,.pc 檔會依選項在 Requires.private 列入 simdutf 或 libhwy;當模組需要連結 C++ 標準庫時(例如啟用系統 simdutf),則另於 Libs.private 加入 -lc++:
/// Returns the Libs.private value for the pkg-config file.
/// Vendored C++ dependencies are built in no-libcxx mode so consumers
/// don't need libc++.  System-provided simdutf still requires it.
fn libsPrivate(
    zig: *const GhosttyZig,
) []const u8 {
    return if (zig.vt_c.link_libcpp orelse false) "-lc++" else "";
}

fn requiresPrivate(b: *std.Build) []const u8 {
    const system_simdutf = b.systemIntegrationOption("simdutf", .{});
    const system_highway = b.systemIntegrationOption("highway", .{ .default = false });

    if (system_simdutf and system_highway) return "simdutf, libhwy";
    if (system_simdutf) return "simdutf";
    if (system_highway) return "libhwy";
    return "";
}
跨平台連結器客製與二進位修補
單靠 Zig 內建的連結器,還不足以處理所有平台在打包與效能上的邊角細節。src/build/GhosttyLibVt.zig 針對四條建置路徑分別實作了專屬的底層處理。
Linux / ELF:強制切換 LLD 執行符號隔離
ELF 平台的符號匯出由 ghostty-vt.map 這份 version script 控制。它只匯出 ghostty_*,其餘符號(simdutf、highway、wuffs、C++ runtime 與 compiler-rt)一律設為 local,避免與宿主程式內的同名函式庫衝突:
GHOSTTY_VT_1.0 {
    global:
        ghostty_*;
    local:
        *;
};
未來每個次版本只需新增一個節點,列出該版本新增的函式並串接到前一版。程式若用到 1.1 才有的函式,載入 1.0 的函式庫時,動態載入器會直接以版本名稱指出問題。
套用這份腳本的建置設定如下:
if (kind == .shared and target.result.ofmt == .elf) {
    // Export only the ghostty_* functions and tag them with a version
    // that the loader checks. The map file explains the versioning.
    lib.version_script = b.path("src/terminal/c/ghostty-vt.map");

    // Zig's own ELF linker, which Debug builds on x86_64 use by
    // default, silently ignores the version script. LLD applies it,
    // and Zig can only link with LLD when it compiles with LLVM.
    lib.use_llvm = true;
    lib.use_lld = true;
}
註解直接點出了原因:Zig 自帶的 ELF 連結器在 x86_64 debug 建置下會默默忽略 version script,強制走 LLVM LLD 才能確保開發期與發行期的符號表行為一致。
靜態庫:PIC 與胖靜態庫合成
靜態庫同樣有幾項容易被忽略的細節:必須內含 compiler-rt,並且要開啟 PIC 才能被連結進現代 Linux 發行版預設的 PIE 執行檔:
if (kind == .static) {
    // ...
    // These must be bundled since we're compiling into a static lib.
    // Otherwise, you get undefined symbol errors.
    lib.bundle_compiler_rt = true;
    lib.bundle_ubsan_rt = true;

    // Enable PIC so the static library can be linked into PIE
    // executables, which is the default on most Linux distributions.
    lib.root_module.pic = target.result.os.tag != .freestanding;
}
為了不讓下游使用者還得手動尋找並連結內嵌的 libsimdutf.a 與 libhighway.a,專案編寫了跨平台工具 combine_archives.zig。它在建置期生成 MRI 腳本,透過標準輸入管線餵給 zig ar -M,將多個靜態封存檔合併為單一的胖靜態庫(fat archive):
// Build the MRI script.
var script: std.ArrayList(u8) = .empty;
try script.appendSlice(alloc, "CREATE ");
try script.appendSlice(alloc, output_path);
try script.append(alloc, '\n');
for (inputs) |input| {
    try script.appendSlice(alloc, "ADDLIB ");
    try script.appendSlice(alloc, input);
    try script.append(alloc, '\n');
}
try script.appendSlice(alloc, "SAVE\nEND\n");

var child = try std.process.spawn(init.io, .{
    .argv = &.{ zig_exe, "ar", "-M" },
    .stdin = .pipe,
    .stdout = .inherit,
    .stderr = .inherit,
});
之所以要另寫一支 Zig 程式,而不是直接在建置步驟裡寫 /bin/sh -c "ar -M < script",是因為 Windows 上沒有 /bin/sh。用 Zig 自己處理管線,才能讓同一份建置腳本在所有主機上都能執行。
macOS:原生 ld64 連結與 libSystem 符號降級
在 macOS 主機上,Zig 內建連結器無法設定 Mach-O 的 compatibility version(永遠寫入 1.0.0),因此 initLibApple 改為先建出靜態庫,再呼叫 Apple 原生連結器產出動態庫:
native_link.addArgs(&.{
    // Emit a Mach-O dynamic library instead of an executable.
    "-dynamiclib",
    // Pull every object from the combined static archive.
    "-Wl,-all_load",
    // Remove unreachable private code pulled in by all_load.
    "-Wl,-dead_strip",
    // Leave room for packaging tools to rewrite install names.
    "-Wl,-headerpad_max_install_names",
});
// ...
// Restrict exports to libghostty-vt's public C ABI.
native_link.addPrefixedFileArg("-Wl,-exported_symbols_list,", exports);
// Link the archive produced by the normal static-library path.
native_link.addFileArg(static.output);
// ...
native_link.addArgs(&.{
    // The name programs record and load at run time, found via @rpath.
    "-install_name",
    shared_version.install_name,
    // The full library version.
    "-current_version",
    shared_version.current_version,
    // The oldest release with the same ABI.
    "-compatibility_version",
    shared_version.compatibility_version,
    // Write the fully versioned dylib used by the install symlinks.
    "-o",
});
另一個問題則與效能有關。Zig 的靜態庫會打包 compiler_rt.o,其中包含強符號(strong global)的 memcpy、memmove 與數學函式。當宿主程式連結該靜態庫時,這些通用實作會覆蓋掉 Apple libSystem 針對硬體最佳化的版本,實測造成數個百分比的 PTY 吞吐量下滑。
libsystem_override.sh(需在 Darwin host 上針對 Darwin target 執行)搭配一份明確列舉 libSystem 穩定匯出符號的清單,把清單內的符號改為 local,同時保留清單以外的 compiler-rt 全域定義(例如 128 位元浮點轉換與 sincos* 等 Apple 未匯出的 intrinsics):
xcrun ar x "$out" compiler_rt.o
chmod 644 compiler_rt.o

# nmedit takes a keep-list (-s): all current global definitions except
# the ones we want to localize.
xcrun nm -g compiler_rt.o | awk '$2 ~ /^[A-TV-Z]$/ {print $3}' | sort -u >all.txt
sort -u localize.txt >loc.txt
comm -23 all.txt loc.txt >keep.txt
xcrun nmedit -s keep.txt compiler_rt.o

xcrun ar r "$out" compiler_rt.o
WebAssembly:可成長的函式表
WebAssembly 版本是一個沒有進入點的執行檔模組,建置設定也各有考量:
// Allow exported symbols to actually be exported.
exe.rdynamic = true;

// Export the indirect function table so that embedders (e.g. JS in
// a browser) can insert callback entries for terminal effects.
exe.export_table = true;

// There is no entrypoint for this wasm module.
exe.entry = .disabled;

// Default Zig stack size in Zig 0.16 is 1MB. Lower to 128 KB since
// this has to be preallocated up front in Wasm linear memory. Peak
// stack under various artificial loads is 17 KB at the time of this
// comment but lets do 128KB to be safe. We can lower later.
exe.stack_size = 128 * 1024;
JavaScript 宿主需要在執行期動態註冊回呼函式(寫入 __indirect_function_table),但 Zig 目前的 WASM 連結器不支援 --growable-table,匯出的函式表上限被鎖死(max == min)。建置系統因此在連結後再跑一支 wasm_patch_growable_table.zig,定位至 Section 4(Table Section),把限制旗標從 0x01(有上限)改為 0x00(無上限),同時剝除原有的 LEB128 max 欄位並重新計算 section 長度:
// Build the new section payload with the max removed:
//   [table count + elem_type] [flags=0x00] [min] [trailing data]
var payload: std.Io.Writer.Allocating = .init(alloc);
try payload.writer.writeAll(input[section_start..flags_pos]);
try payload.writer.writeByte(0x00); // flags: no max
try payload.writer.writeAll(input[min_start..max_start]);
try payload.writer.writeAll(input[max_end..section_end]);

// Reassemble the full binary:
//   [everything before this section] [section id] [new size] [new payload] [everything after]
const before_section = input[0 .. section_start - 1 - uleb128Size(section_size)];
var result: std.Io.Writer.Allocating = .init(alloc);
try result.writer.writeAll(before_section);
try result.writer.writeByte(4); // table section id
try result.writer.writeUleb128(@as(u32, @intCast(payload.written().len)));
try result.writer.writeAll(payload.written());
try result.writer.writeAll(input[section_end..]);
return result.written();
三層自動化 ABI 與標頭檔防禦管線
為了針對已建模的公開型別佈局、匯出符號與函式簽章進行自動化把關,libghostty-vt 建立了三層驗證機制。
第一層:編譯期 translate-c 雙向反射測試
測試套件(abi_test.zig)利用 Zig 的 translate-c 將公開標頭檔 <ghostty/vt.h> 轉換為 Zig 模組,並在編譯期透過 @typeInfo 反射,逐一比對每一個 C struct、union、enum 與回呼函式指標跟 Zig 內部 extern 型別的大小、對齊(alignment)、欄位位移(offset)及列舉值。只要在標頭檔新增型別卻忘記註冊,或兩邊欄位順序不一致,測試就會報錯,例如:
GHOSTTY_CELL_WIDE_WIDE: the header says 5, Zig says 1此外,build.zig 會以三種語言標準搭配最嚴格的警告設定,編譯一個只 include vt.h 的檔案,確保公開標頭檔在各標準下都零警告:
const warnings: []const []const u8 = &.{
    "-Wall",
    "-Wextra",
    "-Wpedantic",
    "-Werror",
};
const Case = struct { std: []const u8, src: std.Build.LazyPath };
const cases: []const Case = &.{
    .{ .std = "c11", .src = c_src },
    .{ .std = "c23", .src = c_src },
    .{ .std = "c++17", .src = cpp_src },
};
第二層:跨平台二進位內嵌 JSON manifest 檢驗
函式庫在唯讀資料段中內嵌了一份由編譯期反射生成的 NUL 結尾 JSON 型別清單。檢驗工具(src/terminal/c/abi/check.zig)完全不需要執行目標二進位檔,而是直接解析 ELF、Mach-O 或 WASM 結構中的匯出符號表與內嵌 JSON,因此能檢驗交叉編譯出的產物。黃金基準檔依目標平台命名,並以建置步驟的形式掛進 zig build:
// Goldens are named after the target, such as x86_64-linux-gnu. Targets
// with no ABI leave it out, such as aarch64-macos.
const arch_os = b.fmt("{t}-{t}", .{ target.cpu.arch, target.os.tag });
const golden = if (target.abi == .none)
    b.fmt("src/terminal/c/abi/{s}.json", .{arch_os})
else
    b.fmt("src/terminal/c/abi/{s}-{t}.json", .{ arch_os, target.abi });
check.zig 的檔頭說明列出了日常使用的指令。前兩行檢查目前變更是否只新增了 ABI,確認是刻意的新增後,再用第三行更新該平台的基準檔:
zig build test-lib-vt-abi
zig build test-lib-vt-abi -Dtarget=wasm32-freestanding
zig build update-lib-vt-abi -Dtarget=x86_64-linux-gnu
唯有符合規則的擴充(新增型別、新增列舉值、列舉值新增 key 型別、在 sized struct 尾端新增欄位,或已登記於 symbols.txt 的新函式)才會通過。若有人對調了兩個列舉值,檢查會逐行列出:
GhosttyCursorStyle.values.BAR: golden 0, now 1
GhosttyCursorStyle.values.BLOCK: golden 1, now 0
第三層:C 探針庫與 libabigail 深度比對
在 Linux CI 中,直接用 abidiff 分析 Zig 編譯出的 .so 會遇到障礙:Zig 在 DWARF 除錯資訊中記錄的是 Zig 內部命名空間(例如 terminal.c.terminal.new)且未標記為外部符號,導致 libabigail 看不到公開函式的型別。test/abi/check.sh 因此讀取公開標頭檔與符號表,動態生成一個 C 語言「探針函式庫(probe library)」:
#include <ghostty/vt.h>

__typeof__(ghostty_terminal_new) *const abi_ghostty_terminal_new = &ghostty_terminal_new;
__typeof__(ghostty_terminal_resize) *const abi_ghostty_terminal_resize = &ghostty_terminal_resize;
// ...and so on for every function.
這個探針庫由標準 C 編譯器加上 -g 編譯並連結 libghostty-vt.so,再交由 abidiff 與 baseline.abi(搭配 libghostty-vt.suppr 抑制規則)進行兩階段比對:第一輪列出所有差異,第二輪過濾純新增項目。
在日常本機開發中,開發者可以生成當前的 ABI dump,或與官方基準檔比對(注意:baseline.abi 會在 vt-1.0.0 釋出並打上 tag 後由 CI artifact 提交至儲存庫;在此之前本機比對需先透過 CI 下載或本機生成基準檔):
# 編譯函式庫
nix develop -c zig build -Demit-lib-vt -Doptimize=ReleaseFast -Dcpu=baseline

# 本機生成當前 ABI dump(格式與 CI artifact 一致)
nix develop -c test/abi/check.sh dump test/abi/baseline.abi zig-out/lib/libghostty-vt.so

# 若基準檔已存在,比對 ABI 差異
nix develop -c test/abi/check.sh diff test/abi/baseline.abi zig-out/lib/libghostty-vt.so
若某個函式被移除,報告會長這樣:
1 Removed variable:

  [D] 'GhosttyResult (* const abi_ghostty_terminal_resize)(GhosttyTerminal, uint16_t, uint16_t, uint32_t, uint32_t)'    {abi_ghostty_terminal_resize}
error: incompatible ABI change (abidiff exit status 12 without additions)
下游生態系橋接與離線供應鏈支援
即便底層使用 Zig 建置,libghostty-vt 依然把下游整合與 Linux 發行版打包體驗照顧得很周到。
pkg-config 與 CMake 雙軌支援
zig build 安裝時會同時產出動態與靜態兩個 pkg-config 模組。之所以要分成兩個,是因為 pkg-config --static 會納入私有連結相依(Libs.private 與 Requires.private),但不會強制將 -lghostty-vt 解析為 .a 封存檔:
cc -o myapp main.c $(pkg-config --cflags --libs libghostty-vt)靜態連結則改用 libghostty-vt-static 模組:
cc -o myapp main.c $(pkg-config --static --cflags --libs libghostty-vt-static)即便建置主機上沒有安裝 CMake,zig build 也會透過自寫的 cmake_package_config.zig 生成 ghostty-vt-config.cmake 與版本檢查檔,因此已安裝的函式庫可以直接用 find_package 找到:
find_package(ghostty-vt 1.0 REQUIRED)
target_link_libraries(myapp PRIVATE ghostty-vt::ghostty-vt)
自動生成的版本檔遵循 SemVer 的 ABI 規則(1.x 只接受相同 major 版本),還會拒絕指標寬度不同的安裝,避免 64 位元專案誤找 32 位元函式庫。這段 CMake 檢查檔是由 GhosttyLibVt.zig 裡的 Zig 多行字串模板動態產生,{[ptr_size]d} 會在建置時自動填入目標平台的指標位元組數:
\\# Skip the pointer size check if either side doesn't know its own.
\\if("${{CMAKE_SIZEOF_VOID_P}}" STREQUAL "")
\\  return()
\\endif()
\\
\\# Reject an install built for a different pointer size, for example
\\# a 32-bit library found by a 64-bit project.
\\if(NOT CMAKE_SIZEOF_VOID_P STREQUAL "{[ptr_size]d}")
\\  math(EXPR installedBits "{[ptr_size]d} * 8")
\\  set(PACKAGE_VERSION "${{PACKAGE_VERSION}} (${{installedBits}}bit)")
\\  set(PACKAGE_VERSION_UNSUITABLE TRUE)
\\endif()
儲存庫頂層也提供了 CMakeLists.txt 委派包裝器,讓 C/C++ 專案以 FetchContent 直接引入原始碼(主機上仍需安裝 zig),並依需求擇一連結動態或靜態目標:
include(FetchContent)
FetchContent_Declare(ghostty
    GIT_REPOSITORY https://github.com/ghostty-org/ghostty.git
    GIT_TAG main
)
FetchContent_MakeAvailable(ghostty)

# 依需求擇一連結:
target_link_libraries(myapp PRIVATE ghostty-vt)        # shared
# target_link_libraries(myapp PRIVATE ghostty-vt-static) # static
需要交叉編譯時,在 FetchContent_MakeAvailable 之後呼叫 ghostty_vt_add_target(),它會建立帶有平台後綴的匯入目標:
ghostty_vt_add_target(NAME linux-amd64 ZIG_TARGET x86_64-linux-gnu)

# 依需求擇一連結:
target_link_libraries(myapp PRIVATE ghostty-vt-linux-amd64)        # shared
# target_link_libraries(myapp PRIVATE ghostty-vt-static-linux-amd64) # static
包裝器內部會把 CMake 的建置類型轉成 Zig 的最佳化等級,加入 GHOSTTY_ZIG_BUILD_FLAGS 後呼叫 zig build -Demit-lib-vt(以下為核心邏輯節錄):
if(CMAKE_BUILD_TYPE)
    string(TOUPPER "${CMAKE_BUILD_TYPE}" _bt)
    if(_bt STREQUAL "RELEASE" OR _bt STREQUAL "MINSIZEREL" OR _bt STREQUAL "RELWITHDEBINFO")
        set(_GHOSTTY_ZIG_OPT_FLAG "-Doptimize=ReleaseFast")
    endif()
    unset(_bt)
endif()

if(_GHOSTTY_ZIG_OPT_FLAG)
    list(APPEND GHOSTTY_ZIG_BUILD_FLAGS "${_GHOSTTY_ZIG_OPT_FLAG}")
endif()

# ...

add_custom_command(
    OUTPUT "${GHOSTTY_VT_SHARED_LIBRARY}" "${GHOSTTY_VT_STATIC_LIBRARY}" "${ZIG_OUT_DIR}/lib/${GHOSTTY_VT_IMPLIB}"
    COMMAND "${ZIG_EXECUTABLE}" build -Demit-lib-vt ${GHOSTTY_ZIG_BUILD_FLAGS}
    WORKING_DIRECTORY "${CMAKE_CURRENT_SOURCE_DIR}"
    COMMENT "Building libghostty-vt via zig build..."
    USES_TERMINAL
)
成對的離線相依套件包
各大 Linux 發行版(如 Debian、Fedora、Arch 與 Nix)打包時,通常要求在無網路沙盒(hermetic build)中執行。zig build dist-deps -Demit-lib-vt 會把建置所需的 Zig 相依套件打包成結構與 Zig 全域快取一致的 libghostty-vt-VERSION-deps.tar.gz,再由正式發布流程(release workflow)統一以 minisign 產生數位簽章。
PACKAGING-LIBGHOSTTY.md 給出的標準打包流程分成幾步。首先驗證簽章:
minisign -V -P RWQlAjJC23149WL2sEpT/l0QKy7hMIFhYdQOFy0Z7z7PbneUgvlsnYcV \
  -m libghostty-vt-1.0.0.tar.gz
接著把同一版本的源碼包與相依套件包並排解開:
tar -xzf libghostty-vt-1.0.0.tar.gz
tar -xzf libghostty-vt-1.0.0-deps.tar.gz
cd libghostty-vt-1.0.0
然後以相依套件包作為 --system 目錄完全離線建置(ZIG_GLOBAL_CACHE_DIR 必須是全新的空目錄):
DESTDIR=/tmp/pkg \
ZIG_GLOBAL_CACHE_DIR=/tmp/build-cache \
zig build \
  --prefix /usr \
  --system ../libghostty-vt-1.0.0-deps \
  -Doptimize=ReleaseFast \
  -Dcpu=baseline
測試同樣可以離線執行:
ZIG_GLOBAL_CACHE_DIR=/tmp/build-cache \
zig build test-lib-vt \
  --system ../libghostty-vt-1.0.0-deps
--system 會停用所有網路下載,-Dcpu=baseline 則避免編出目標機器不一定支援的新指令集。若發行版把函式庫放在 /usr/lib64,再加上 --prefix-lib-dir lib64 即可,pkg-config 與 CMake 設定檔會一併指向新位置。
自動化建置圖第三方授權稽核
為了協助發行版維護者撰寫授權聲明(如 Fedora 的 bundled() 或 Debian 的 copyright),專案在各個 build.zig.zon 中擴充了自訂的 .third_party 欄位。Zig 會忽略不認得的欄位,因此這項擴充不影響正常建置:
.dependencies = .{
    .wuffs = .{ .url = "...", .hash = "..." },
    .pixels = .{ .url = "...", .hash = "..." },
},
.third_party = .{
    .{ .name = "pixels", .license = "CC0-1.0" },
    .{ .name = "wuffs", .license = "Apache-2.0 OR MIT", .version = "0.4.0-alpha.10" },
},
這項稽核是由兩個階段的工具鏈共同完成:
- 第一階段:建置圖靜態追蹤 - 執行
zig build lib-vt-packages -Demit-lib-vt時,LibVtPackages.zig會走訪(walk)vt_c根模組的所有 import 與連結物件,保守估計並記錄各相依套件中依建置圖判定可能納入編譯的路徑(linked_paths),匯出單一目標的lib-vt-packages.json。 - 第二階段:跨平台彙整與分類 - 發布輔助腳本
nix/build-support/gen-lib-vt-deps.sh會在各個支援的目標架構上執行此步驟,彙整各目標產生的清單,並依建置圖資訊標記"use": "linked"或"use": "build"(此分類仍保留前述保守估計的限制;節錄自deps/libghostty-vt-third-party.json,省略kind、commit等內部欄位):
{
  "name": "highway",
  "version": "1.2.0",
  "url": "https://deps.files.ghostty.org/highway-66486a10623fa0d72fe91260f96c892e41aceb06.tar.gz",
  "hash": "N-V-__8AAGmZhABbsPJLfbqrh6JTHsXhY6qCaLAQyx25e0XE",
  "license": "Apache-2.0 OR BSD-3-Clause",
  "use": "linked"
}
執行期依賴最小化與單檔範例(Ghostling)
最後一項常被現代軟體開發忽視的特質,是執行期依賴最小化與直觀的最小可用範例。
在預設建置下,libghostty-vt 於執行期僅依賴標準 libc;所有 Unicode 處理、SIMD 加速與圖像解碼(simdutf、Highway、Wuffs 等第三方程式庫)預設皆以原始碼形式內嵌編譯,避免下游應用程式陷入繁雜的動態相依衝突(同時保留 -fsys= 選項供系統發行版按需改用系統套件)。
為了讓所有打算整合的工程師迅速理解其運作方式,官方專案同步提供了一個名為 Ghostling 的開源範例。官方範例僅用一個 C 語言檔案(約 1,600 行,搭配開源輕量級繪圖庫 raylib),就組裝出了一個具備完整打字、畫面滾動、顏色渲染與 VT 序列支援的極簡終端機。
這種「單檔即可完整看清生命週期與運作骨架」的設計方式,讓整合者能迅速摸清函式庫的呼叫紋理,大幅降低了採用門檻。
結語:新世代系統函式庫的成熟標準
回顧 Mitchell Hashimoto 這篇 1.0 宣告,它給技術社群帶來的啟發超越了「又出現了一個厲害的終端機核心」。
近年來軟體界常見的論調是「C 語言已經過時,所有東西都該用新語言重寫」。然而,現實世界的工程架構是由複雜的跨語言系統交織而成的。Zig、Rust 等新興語言確實賦予了我們更安全、更高產能的實作手段,但當這些系統核心需要走向世界、成為無數生態系的共同基石時,最可靠的載體依然是經過深思熟慮的 C ABI。
libghostty-vt 展現了一條成熟的工程路徑:
- 用現代語言實作核心 - 享受 Zig 帶來的效能、型別安全與編譯期優勢。
- 用嚴謹的 C ABI 面向世界 - 以不透明控制代碼、列舉存取器、配置器注入與語意化 SONAME,保護每一個下游使用者的穩定性。
無論未來你打算用 C、C++、Rust 還是 Zig 開發系統元件,libghostty-vt 的這些架構取捨,都是極具參考價值的現代範本。